Playful

Friday, May 18, 2012

Cork board frame-Easy 5 minute project

   Today I am going to share with you an easy and fast project to help you deal with this.


     Besides the chick, that artwork was all 2-3 days work (probably less) and that's after getting rid of a few pages. C loves painting, coloring, playing with stickers, and crafting.

     A couple months ago, I purchased two frames from Target that open easily and display artwork.  The problems are one of them is still not hung and I don't find it as easy access to change out when it's on the wall. I have to take it off the wall and open it up and then adjust the new piece of art to look nice. It's great for something special that your child made that you want hung up for awhile, but not for something that you want to change out on a daily or weekly basis in my opinion.

     I have looked around for other ideas of displaying art. I created a large frame of artwork (here), it is more of a permanent piece. I want something in the kitchen that can be changed frequently and with about the same effort as hanging art on the fridge.  Kids love seeing their art they created displayed.

     I love the look of having artwork in a frame, but not the amount of effort it takes to change it out on a daily basis so I decided to create a cork board frame that looks nice and is easy to display artwork. 


So simple!


Materials you will need

  • Frame
  • Mat
  • artwork
  • corkboard


1. Gather your materials


2. Remove the back of the frame and the glass


3. Lay the mat on the back of the frame


4. Lay the cork on top of the frame


5. Lay the backing over the cork board and seal shut


Step back and admire your work! That's it!


I love how quick and it easy it was do!


   I am so happy with the way it turned out!  It was so easy to make.  I love that I can prop the frame on an easel or hang it on a wall. I hope you make one! I gotta go...off to make another one!

*You can see how we made the flower art here.


Thanks for stopping by!

Shawna


Thursday, May 17, 2012

Lion puppet-2 day project with toddlers

     This week we are working on the letter L. C loves making animals and puppets so I decided to make a lion puppet.  I saw this and thought it was cute, but I wanted to turn it into a puppet so that C and her friends could actually play with it.

Here's how we made it:

Day 1
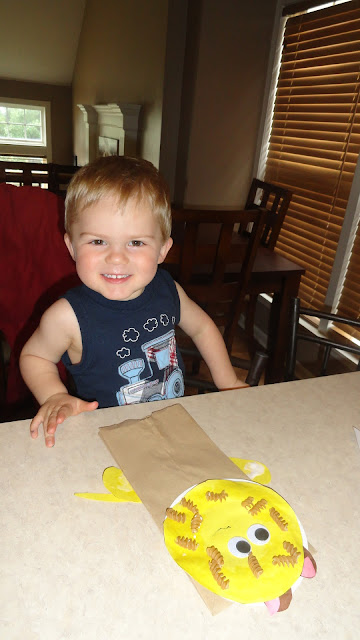
     First, I cut out brown circles and realized that they looked like bears so I made yellow circles instead.   The lions still have brown ears because...well...it was just easier than having to cut new ears also. 

    I had them glue ears on the back of the head. Then, I had C and K glue pasta on the lion's head for the mane.  We let the pasta dry on the lion's head overnight.


Day 2
I gave the children their lion's head and they glued it on to the top of the paper sack. Next, they glued the tail on the back of the puppet.   Then the eyes.  And walla!  Cute little lion puppets!  C and K had so much fun playing with them.


Roar!

    Were you scared?  Me neither.  But they sure tried!  This activity took a little more prep work than most other crafts and activities we do because they cannot cut yet.  They are able to glue everything on and do that by themselves.   There was a lot of cutting and tracing but look at their faces. They had so much fun!    It was well worth my time. 

      I keep all of her puppets in a file folder and then on rainy days I get them all out.   They love playing with them.

Thanks for stopping by!

Shawna


Pin It

Tuesday, May 15, 2012

Milk painting Marshmallows

       Today we painted marshmallows with milk!  I originally saw the idea (here) where they were painting popcorn and large marshmallows.  We have painted popcorn, shredded wheat, oatmeal squares, paper, crackers, and marshmallows using this method.  It's so easy and the kids love it.  It's a great way to use up milk that is about to spoil!

Here's what you need
  • milk ( I usually do this right before the date expiration) 
  • food coloring
  • bowls
  • paint brushes


Talking about the letter M very briefly!  I showed them a bag of marshmallows and pretended to eat one and said "mmmm." 

Staring at the marshmallows.
 
 Milk, food coloring, and bowl is all you need.

1 Tablespoon of milk
Food coloring

Grab a paintbrush and marshmallows and start painting away

Working on motor skills and not even aware of it!


Gripping a small marshmallow and painting it requires concentration and good hand-eye coordination.


Checking out what others are doing.

Mmmm...I think I'll have one.


What happens if I dump pink into purple? 
"It kind of looks closer to brown." C says.

Can I get away with eating 1 marshmallow?  Let me see....

Or instead of painting them...you could dump them in the bowl.

  
      We had so much fun!  You should try it!  You can eat the marshmallows or let them dry and then use them to create a piece of art.   This is a great way to get rid of marshmallows.  Honestly, the kids usually eat 4-6 marshmallows when we do activities with them.  I will take that over having them finish off the rest of the bag by themselves. 

I'm linking to
NurtureStore
abc and 123
Someday crafts
Welcoming Spirit
Growing a jeweled Rose


Pin It

Saturday, May 12, 2012

Here's what I've been up to

  Here's a sneak peak!  Tutorial and more pictures are to come. 


Thanks for stopping by!

Shawna

Pin It

Thursday, May 10, 2012

Hat play using bowls

      The other day I was cleaning up lunch and one of the children had found a bowl that was in a toy box and was putting it on his head and pretty soon C comes up to me and says "mommy, I want a hat too."  I'm thinking "a hat"  and I turn around to the child with a bowl on his head and said "okay," gave her and her friend each "hat."  They had so much fun playing with these. 

 Uh oh my hat just fell off.
 Oh no


Wow!  She figured how to keep it on her head.  What great balance she has.

     I love it when simple things provide children with entertainment.  Without knowing, they were working on balance to leave the bowl on their head and hand-eye coordination when trying to catch the bowl when it fell off their head.


Thanks for stopping by

Shawna


Pin It