Playful

Thursday, June 28, 2012

Monkey puppet

     Kids love puppets!  Today we made monkey puppets.  I got the inspiration here.  They are so cute!  Now, this activity took some prep work from me, but the kids love playing with the puppets after they are done making them and that it makes the extra effort so worth it. 

Materials you need
Brown, white, and red construction paper
googly eyes
paper sack
scrapbook paper (construction will do)

Here's how we made it
1.  I made a pattern for the monkey's head, ears, mouth, tongue, nose, tail, and hat by looking at the example. 


2.  Then I cut them out and traced each part on colored paper and cut them out.  And made piles of all the materials for each kid.

3.  We glued the hat and the red strip onto to the top of the paper sack.

4.  Add the eyes.

5.  Add the ears and the mouth onto the paper sack.

6.  Glue the tail onto the back of the paper sack.

7.  And you have an adorable monkey puppet.


Side note: I do not have a lot of pictures along the way since this monkey has several steps to it and I was busy helping toddlers.  They always want to put glue on EVERYTHING.  

Thanks for stopping by!

Shawna

Pin It

Tuesday, June 26, 2012

Pudding Feet painting

  We painted with our feet today!  It was so much fun!  It's a great sensory activity, following direction activity, and just plain fun.   I have had this box of Jello pudding sitting in the pantry for a couple of months so I decided to use it for this activity.  Pudding cleans up easier than the regular finger paint in my opinion.  

Here's how we made:
Make the pudding according to the instructions on the box.  (I used milk that was about to go bad).

Waiting for me to give the pudding to color.


 Each kid picked a color and put it in a bowl.  I put the dye in the bowl for the 22 month old.  

Then stir.


I asked each child what color he/she wanted and dropped some on the paper.   Then the painting began!


Skating on paper.


Looking at C's picture.

Little A did not move.  She had a huge hole in her paper where her little feet were.  She wasn't quite sure what to think of the pudding on her feet.

K loved it.  He painted two pictures.

C loved it also!

I'd say this face says it all!  

      This activity was so much fun!  They painted for 30 minutes and not 1 of them got off the blanket.  The clean-up was easy.  I wiped their feet,  tossed the blanket in the washer, and laid it outside to dry.  We had so much fun painting with our feet and look forward to doing it again soon!

Thanks for stopping by!

Shawna


Pin It

Friday, June 22, 2012

Patriotic Fruit Kabob With a Twist

    Today I am exicted to share with you my fruit kabobs with a sweet treat on them.  They have 2 of my favorite foods: chocolate and fruit.  I don't know about you, but I can NEVER eat enough chocolate!  I LOVE it! 

     
     While I was making fruit kabobs the other day,  I thought it would be a great idea to make a chocolate-covered strawberry and put one on my kabob.   Instead of eating 10-12 (or more) chocolate-covered strawberries, I ate 3 kabobs.  I felt satisfied and not guilty about eating a sweet treat.  C loved them as well!  She ate 2 of them. 


     I love these kabobs because they are so versatile.  You can add whatever fruit you want or you could make a kabob with all chocolate-covered strawberries on them.  YUM!


    These are the perfect summer treat!  Their light, sweet, and healthy.  I can't wait to bring a patriotic treat that everyone can feel good about eating  to our 4th of July gathering!

Side note:  If you are giving these to a younger child please be aware of the sharp point.  We pulled C's off and laid her stick down on the table. 


Thursday, June 21, 2012

Letter fun with silverware

   The other day while C was eating lunch she said, "Look mommy, I made the letter T."


 She had made the letter with her silverware.    She was so proud.

Next, she wanted to make the letter X


After trying to make an X from memory, she asked me to make an x with my silverware so I did.


Then she wanted to make a letter A.

She realizes here that she will need another piece of silverware so she asked me for one and I got it for her.


She's so proud of her letter A!

Then she made a Y.


 Next up, an H.

I love watching her learn and watching her impress herself.  Her imagination and creativity amaze me everyday.   This activity is great for motor skills and letter formation.  Although she cannot write letters yet, it is nice to know that she knows what they look like and can form most of them from memory.  This is an excellent pre-writing activity.  

Thanks for stopping by!
Shawna

Tuesday, June 19, 2012

Dairy and Gluten Free Almond Crackers

   I have an easy and kid-friendly recipe today to share with you.   Have you ever considered making your own crackers? If not, go in your pantry and look at all the ingredients that are on the box of crackers and you might change your mind.  I did.  I didn't realize how easy they were to make until I  saw this.   These crackers are dairy free, gluten free, kid-friendly, fun to make, and use 3-4  ingredients.  


    Here's how you make them

    1 cup of almond meal (If you do not have almond meal, you can make it by placing 1 cup of raw almonds in the food processor  and pulse it until it is a fine texture.  C loved pulsing the processor)  They both work great!

 1 egg white

 a pinch of salt

 Butter (optional-I have used this 1 time)

1 egg white


1 cup of almond meal or almonds ground up in a food processor.


Pour 1 egg white into the almond meal and stir.  Add a pinch of salt.


Keep mixing. 


When the dough starts to get wet, press on the crumbly mixture to bring together.


Move dough onto pan.  Use silicone baking sheet or parchment paper.
  The instructions stressed to use parchment paper, but I have made these 4 times using my silicone baking sheet cover and have not had any issues with the crackers sticking to the sheet.


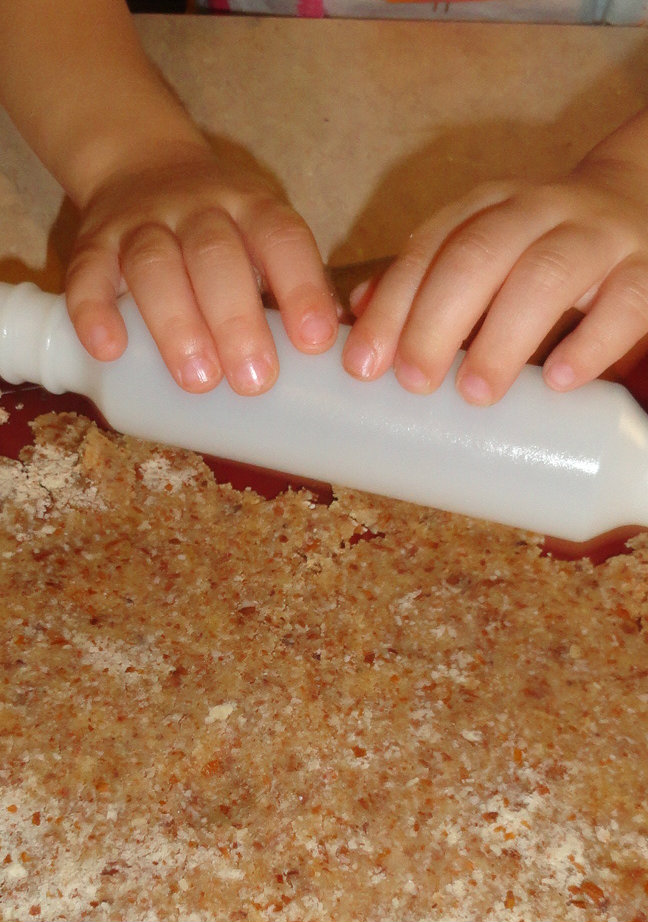
Roll out the dough.  You want to get it thin.  It's great to have a little helper!


Keep rolling until you get the dough rolled really thin.  I have C help me sprinkle almond meal onto the dough and the rolling pin to prevent sticking.


 Use a cookie cutter (if you want) to make cute shapes.  If not use a pizza cutter to cut square-like crackers.  It's so simple....leave the shapes that you cut on the pan.  You do not need to separate them before baking.


    Optional-Melt 1 Tbs or less of butter (or DF butter) and spread on top of crackers using a pastry brush.  Sprinkle a little bit of salt over the crackers.  Put in oven and bake for 10 minutes at 325 degrees.  If you have any crackers that are starting to turn brown remove them immediately and let the rest of the crackers continue baking.  The outside crackers are done first.  Keep removing them as they get light brown.  It usually takes about 20 minutes for all of the crackers to be finished.  I check the oven after 10 minutes then every 3-4 minutes after.


While the crackers are baking, get a cookie cutter and make cheese flowers!
I love cheese with crackers!


 Use a cookie cutter to make fun shapes from cheese.


 Or use the cheese for eyeglasses


 Or eat the cheese scraps.


Ta da! Enjoy your delicious crackers.


     If you are not eating the crackers right away make sure to store them in an air tight container as soon as they cool off.
 
     These crackers are good by themselves or you can eat them with cheese.  Go ahead and make them!  Even if you can have wheat make them.  They are delicious!  They are easy and a great kid-friendly recipe.  We had so much fun making and eating them together.

Since taking these pictures, C can sadly no longer have dairy so no more cheese and crackers for her, just crackers.  


Thanks for stopping by!

Shawna