After deciding my car was in need of help, (read more about that
here), I set out to make a car organizer. I went looking for one at a few stores and didn't find what I was looking for so I looked on the Internet for inspiration
. I found it here.
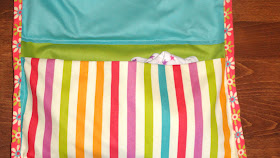
And here is my version
I love how it turned out! I tried to follow the tutorial, but I made a mistake by sewing the bottom pocket on first where as the tutorial sews the top pocket on first and then moves downward. I realized I messed up and couldn't follow the tutorial so I made it up as I went along. The pockets sag a little; I wanted several items to fit in there. I wanted my pockets to hold toys and not just books.
My car floor and seats are toy and clothes free! I don't have C whining that she wants a certain toy or book that is on the car floor while I'm driving. She is able to reach what she needs from her car seat by herself. Mission accomplished!
Disclaimer: I am a beginner when it comes to sewing. I will show you how I made it and what worked for me.
Here's how I made mine
I used 4 different types of fabric.
I measured 2 pieces (the green my main fabric) to be 26 Length by 15 Width.
The other 4 (I ended up using 3) to be 15 x 16
I ironed all the pieces
I cut out 2 pieces of fabric that were 2 x 52. You can do 3-4 strips if you want, but you want it to total up to 104 inches.
Sew the strips together
Fold the strip in half and iron and then fold in half again and iron. You will have a thin, long piece that is your binding.
Next, pin your 2 main pieces of fabric together. Cute sides facing each other. (You want the back of the fabric on the outside). Sew the sides together. Leaving about 8 inches open. Then turn right side out and fold the fabric down and stitch that together. You can also hand stitch. This will be the bottom of the organizer and will not show.
Take your smaller pieces of fabrics (pockets) and fold ugly sides touching
Iron
Next, (from now on this is where my organizer is different from the tutorial. I sewed the bottom pocket on first.) Pin the bottom pocket to the main part fabric and sew.
Next, take the next pocket and you will lay fold side facing bottom. Then, at the top you will fold over the edge and sew. I sewed a 1/4 seam.
Pin the bottom pocket fold side down to the organizer and sew. (Please note in this picture it looks like the top of the pocket is sewed to the organizer but it is not. Look at the picture below where I have pinned).
Repeat the same process you did with the previous one with this one. You will lay fold side toward bottom and sew the top of the pocket to 1/4 seam.
Pin the pocket to the organizer and sew. Now you've finished sewing the pockets on.
Next, take the binding and at the fold wrap it around the edge of the organizer and pin.
Keep wrapping the binding around at the fold and pin.
Sew. The tutorial I used said to sew at the very edge of the binding but since I am not a sewing professional I had a tough time catching the binding on both sides of the organizer. I found it was much easier to sew down the middle of the binding and still looks nice.
For the ties, I measured 2 strips of 2 x 20 and repeated the same process that I did for the binding. I attached each string at the top of the organizer 2 inches in on each side and then stitched the ties on. (Sorry no pics here)
I am so proud of the organizer! I love the colors and it has been a lifesaver in my car. Everyone that has clutter in their backseat should have one.
When I put the backpack there, C is able to reach all of her toys while buckled into her car seat. I have also used my purse. For short trips, she picks out what she wants from there when she gets in the car and then she puts them away before she gets out.
I love my car organizer! I cannot wait to make one more! It helps keep extra clothes and toys off the seat and floor of the car. I don't know what I did without one! Oh yeah....my car was a DISASTER!
Thanks for stopping by!
Shawna

I'm linking to
Someday Crafts,
The Southern Institute,
Clean and Scentsible,
Sew Much Ado,
Southern Lovely,
Creations by Kara,
Polkadots on Parade,
Laugh, Love, and Craft,
Christina's Adventures,
Loving this Crazy Life,
House of Hepworths,
Gluesticks,
Somewhat Simple,
momnivore's dilemma,
Handy Man, Crafty Woman,
The 36th Avenue,
A Glimpse Inside,
not just a housewife,
Whipperberry,
Liz Marie Blog,
Two Sasters,
Tatertots and Jello,
I Heart Naptime,
Bowdabra Blog


